

Customer Reviews With Photos
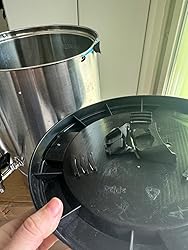
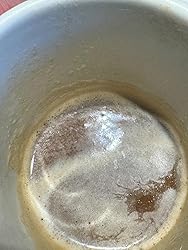
Not happy with this at all. This item for garbage only. Please check pictures . Disappointed in this kind of service.
Like everything about the coffee maker! But... On the base of the maker, front right side, there is a little button switch that indicates, by tiny blue light, if burner is on. However it is very difficult to see if light is on, unless you get up to it and bend down. Even if all the lights are off in the kitchen, the blue is not bright enough to be visible from 5 feet. So, we've burned a few pots overnight when there was just a little left in the pot. I guess we're just stupid, but it is aggravating. Bunn,..... make the blue light brighter! But good coffeemaker. This is like my 4th Bunn. First one I've had a complaint about. Love the new dripless spout😍
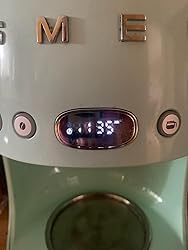
This is a beautiful coffee pot. Like the other reviews, it's difficult to get the water in. If you have the mint colored kitchen aid appliances, it matches pretty well. The ability to set your timer the night before is great. The pot itself has already broken at the handle within the first 6 months. This will not last forever and for the price point, its a little disappointing. My clock has already broken as well, see the picture. I spent $35 on the replacement pot which, you can already feel how cheap the plastic handle is when you fill it with water even to the 8 cup mark, I'm sure over the lifetime of this pot I'll end up buying several replacement pots. If you don't use it everyday or every other day, I'm sure it will last you longer but you will still definitely be replacing pieces.
I had an older version of this model several years ago and I loved it. I really like the ease of setting the clock and delayed brew timer. What is really cool is that there is one water reservoir for the carafe as well as the single cup brewer. Since I don’t pour water in every morning to brew a carafe, I do have to check to make sure there is water in the reservoir. I think the way the water reservoir sits at the back of the machine is really cool and it can be repositioned to sit on the right. The carafe and keeps warm unit is tucked away on the left side of the machine so when you look at the machine straight on, it looks like a single serve maker. It takes getting used to locating the carafe on the side but it looks really sleek on my counter. I am thrilled with my purchase! Thank you Hamilton Beach for redesigning this good old product and making it into an updated, easy to drive coffeemaker!
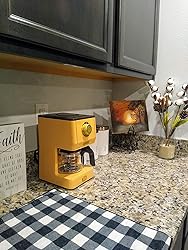
The color is champagne, with my camera is it came out looking yellow. I love the vintage look! I tried it on the 1st and 2nd level of darkness and it the drip is slower as you up the levels. The only downside to me is the spout. When you pour your coffee, you can't rush or it will spill out. Besides that, I like it. I would recommend it.
I purchased this tea maker from another vendor to replace an identical one that served me well on a daily basis for the last 5 years. I have 3 suggestions for the use of this tea maker. 1. Use it with a baking/cookie sheet pan under it to control inevitable leakage. You will find that it WILL leak when you get in a hurry and do not properly follow instructions. My old one has leaked several times over the last several years - not because of a defect, but because of my inattention. This is no big deal if you use the baking/cookie sheet pan. 2. Use two 32oz plastic soda fountain cups to make your ice that you put in the brewing pitcher. Be sure to cover the top of the cups or the water will freeze from the top down and bulge out the sides of the cups and the frozen ice will be impossible to remove (I use a mailing envelope to cover the top of both cups). The ice from these cups fit nicely in the brewing pitcher. 3. Get 3 jars WITH lids that are 1 quart in size. Pour the brewed tea into the jars to overflowing so that when you put the lids on the jars there is no oxygen in the jars - your tea will last longer by doing this. Put the jars of tea in refrigerator and remove as you use them. I use discarded instant Lipton glass tea jars a friend gives me - they also serve as my serving cups. They are tall and will fit in my car's cup holders. I do not add ice after the tea is brewed for the added ice dilutes the tea.
There's an advantage for having both K-Cup & Carafe in a combo spout for space saving, but here is the problem. If the K-cup has leak on the seal, the water then overflow outside the the kCup container, it doesn't have proper drainage. It could spill to place that beyond the cup can contain. In the classic design if this happens, the leak still drain within the glass area. The K button seems unecessary if you used to have old Keurig, the brewing process starts after pressing cup size. The new model need to press extra K button to start. In total with this model you need to press 4 buttons to start brew: 1 power button 2 k-cup or Carafe option 3 cup size button 4 K button Sometimes you have to redo step 2-3 when you pressed these when water not hot ready. Overall if you have space probably this not a good option. But the water reservoir location(s) is perfect on this model.
Works perfect 👌 I have been using it everyday one or more times a day for over a month. Love love love the frappe recipe book it comes with also!.
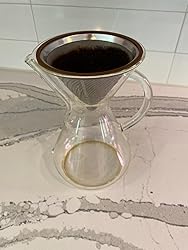
I switched back to pour over coffee after using the CHEMEX coffee maker with my Osaka Cone Dripper. This has more flavor than making coffee using a paper filter pour over and a French press. Obviously, a paper filter is the easier to clean after making coffee but I believe it’s easier to clean than the French press. The CHEMEX coffee maker is with thicker glass than the Osaka coffee maker that came with the Osaka Cone Dripper. The Osaka Coffee Maker cracked after using it for a month. I have never washed the Osaka Coffee maker in the dishwasher but now that I have this CHEMEX coffee maker, I regularly put not the cone dripper and CHEMEX coffee maker in the dishwasher.
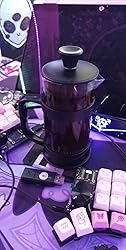
//UPDATE they reached out to me & offered to replaced it without me asking! It arrived intact. it works great for one or two cups of iced or hot coffee- its very cute & i highly recommend at the price. I dont fault the product for being too fragile, it does seem rather durable, the glass isnt too thick but its sturdy enough & the second one had no issues at all. arrived broken in box but i needed coffee and the break was clean. needed coffee so i fixed it but i doubt itll last long - if it wasnt broken itd be five stars its a cute single cup or two small cup french press thats easy to clean and has a decent seal between layers. good lil press just, yknow- it got here broken and i was too impatient, girl needs her coffee. y
Shipped on time marker is awesome!! The only issue is the the Mr Coffee sign is up side down on the front!! Must of been a defect but other than its awesome !!
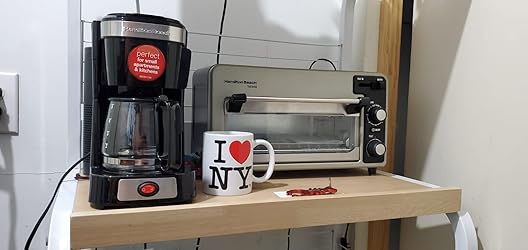
Got this for a friend with only a tiny kitchen area. This is small and cute and makes a perfect amount of coffee for 1-2 people. The only thing that would make it better would be if it came with a washable filter so you don't have to buy paper ones.
Wasn’t sure what to expect with this, but overall I ended up liking it. To preface, I once opened and ran a coffee shop back in the late ‘90s so I know a thing or two about coffee. I still own and use a low end (but not cheap) espresso machine. I was most interested in using this for camping. In the past for camping coffee I’ve used everything from titanium French presses and percolated coffee makers, to pour over kits and even k-cup based makers. They all have their place, IMO. When it comes to camping - or just trying to be compact and light in general - you’re always compromising something so I was willing to give this a little latitude. At the same time, if it isn’t going to produce a cup of coffee that I want to drink, I’m not going to use it! To me, the most appealing aspects of this unit are its versatility and size. It isn’t any bigger than your classic thermos and yet it houses an impressive set of features. The fact that you can heat the water with this is amazing but I also love how much you expand its ability to make cup after cup by starting with hot water. I already have a micro burner that I use for cooking and heating water anyway, so using that with this would be easy and fast. To test, I started with hand grinding espresso beans to a pretty standard fine grain that I would use with my regular espresso maker. For the initial coffee making, I wanted to see if it could actually get the water hot enough on its own and was surprised to see it actually did. It didn’t produce as good of an espresso as my machine, but what it did make was enjoyable to drink and had what I’d consider an ‘ok’ amount of crema. Not a lot, but enough to at least give you a pleasant experience. Subsequent tests with pre-boiled water resulted in slightly more substantial crema but perhaps the machine was just breaking in, lol. I never used a “Nespresso” machine before and had to go out and buy the pods in order to finish testing the unit. I have to say, this might be the most appealing aspect of this. Having these tiny Nespresso pods on hand to pack into kit would kind of be a bit of a camping game changer. Again, this is not bespoke artisan brick wall coffee shop loveliness, but… those little pods make something that I definitely would enjoy on the trail or out in the woods. Overall, I’m pretty stoked to add this to my camping kit and look forward to many cups of the jitter liquid while enjoying nature this summer!
Excelente me gustó mucho su tamaño es perfecto para 5 tazas de café , fácil de limpiar
Just what I wanted. Classy looking, works really well, has a protective case. It's great. Highly recommend!!! I drink any kind of coffee, brewed in any kind of way. I have a soft spot for pour over coffee brewing because sometimes the best cup of coffee has come from that. I was looking for a new pour over system- partly because I was considering a gift for my husband to keep at work, and partly for use for me. So far, this has been for me, lol! I had been using a silicone brewer--great, but needs a specific sized paper filter. I figured I would go the permanent route of trying a steel filter. As I shopped, it was then I discovered that there are steel filters that also serve as the brewing vessel. woah. Then I saw some come with a pot for the coffee to pour into. I prefer the kind that sit on a mug. This borosilicate glass mug with stainless steel brewer filter WITH a carrying/storage case stood out among all the others. Actually, I only saw one other with a carrying case, and it was really just a draw string bag. Boom, decision made. Ok so, add coffee to filter, place on top of mug. Pour hot water over filter. It seems like the coffee would just pour out from the filter holes and make a mess, but it doesn't- there are slats in the base of the filter that allow the coffee to pour directly into the glass mug. Very clean brew, very clean looking system. A steel lid can be used as a coaster for the mug, or for the spent filter, or as a lid on the mug (as a loose cover, not a secure lid). All of it easy to clean. The hard/firm soft case (like a soft but firm case for sunglasses. Clamshell style?definitely neoprene) is formed to perfectly fit the mug and filter. Has zip closure. Also a snap loop that keeps it extra secure and allows for hanging. Takes up very little room. The glass mug is clear. Reminds me of a lab beaker of the sort. This might be also why I was drawn to it as my husband works in a lab. I have tried the filter on other mugs. If the base was just a little wider, it would work on most mugs. It will definitely work on most or all travel mugs. Love everything about this pour over brew system!
